
Buy a Raspberry Pi 4B
You can buy the Raspberry Pi 4B board on Amazon, the recommended version is 4 GB. You may also need to buy a SD card, and optional case with fan.
Choose SD Card
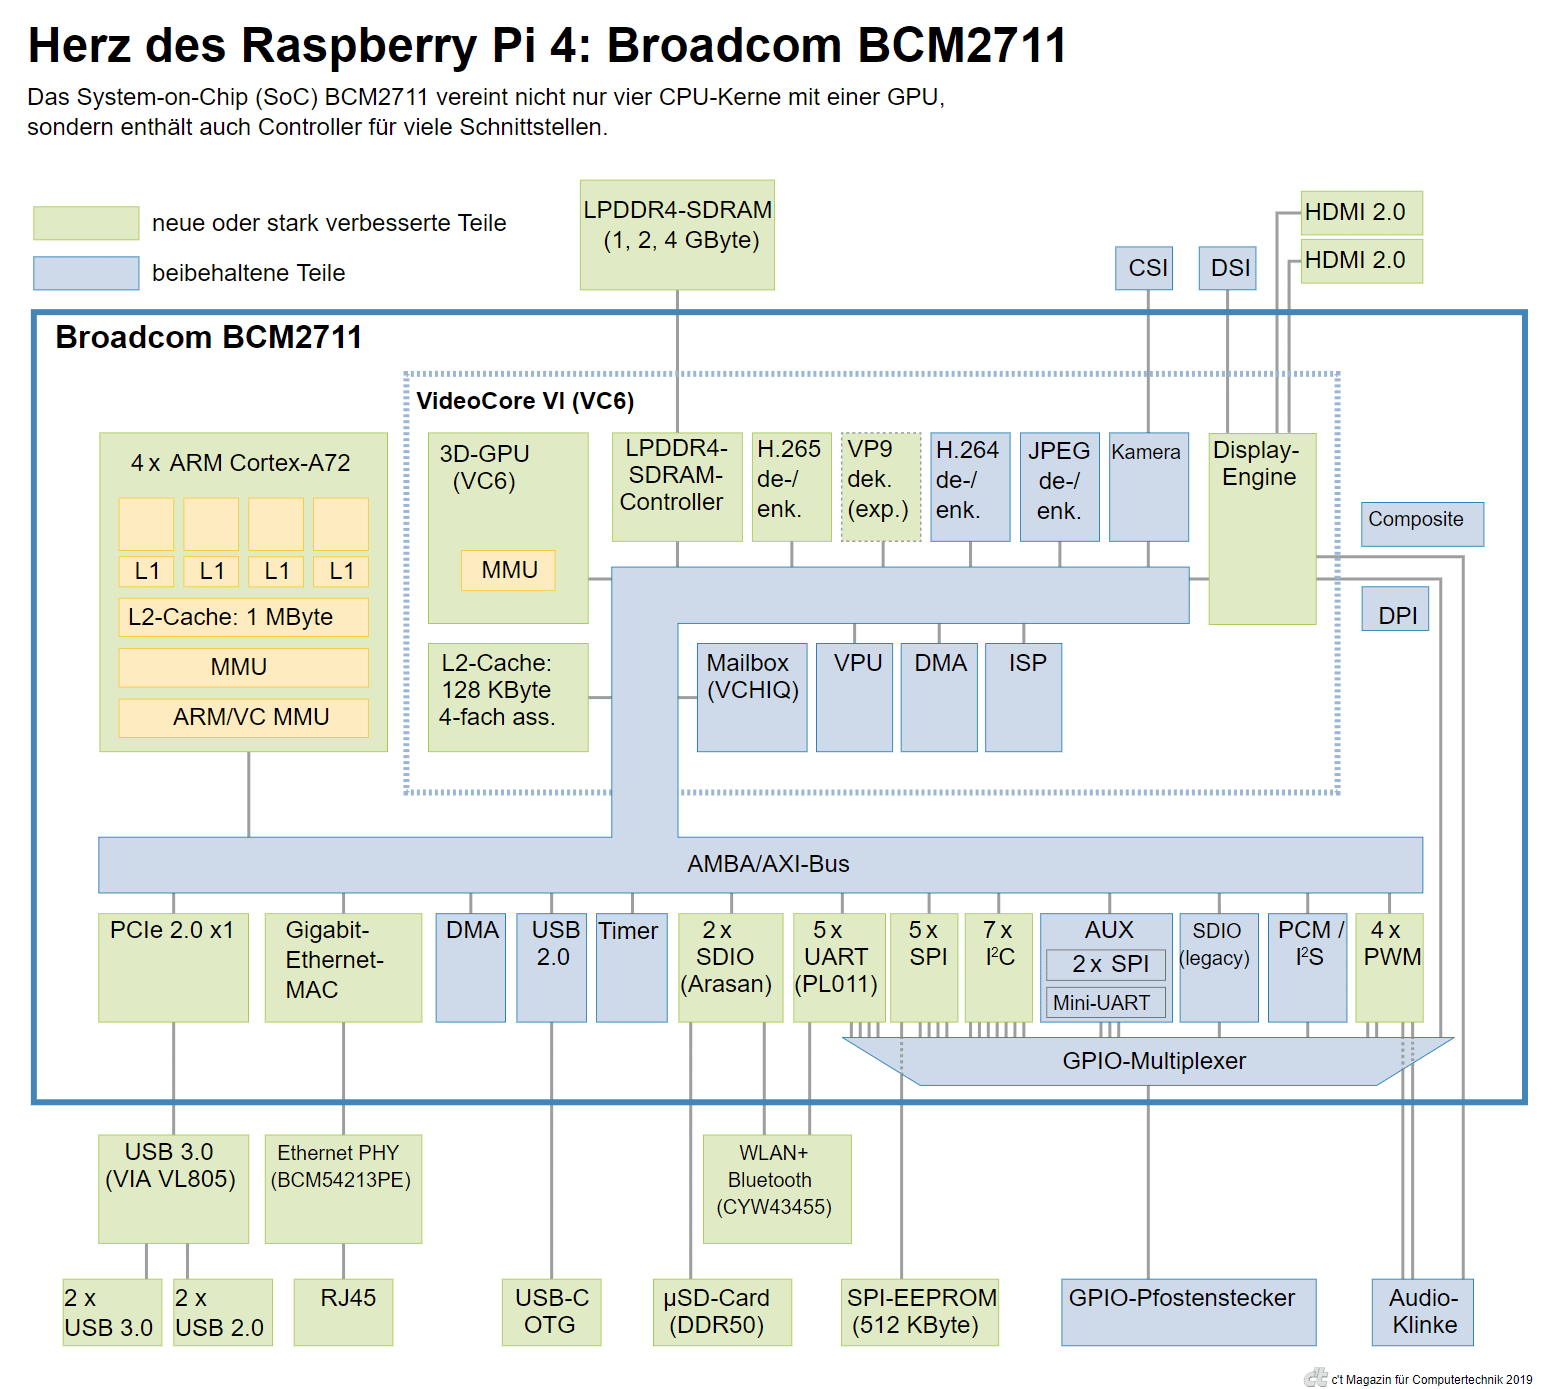
Raspberry Pi has no internal storage, relying instead on a removable micro SD card as his primary boot drives. Raspberry Pi 3 doesn’t support UHS mode because it requires 1.8v signaling while Raspberry Pi 3 is fixed at 3.3v. This is technically the upper bound of write speed (25MB/sec) for non-UHS SD cards. Now Raspberry Pi 4B provides a SD card socket runs on DDR50 bus speed mode and a legacy SDIO interface is available on the GPIO pins.
There is a micro-SD performance improvements with Raspberry Pi 4. Raspberry Pi 4 still doesn’t provide good support for A2 SD card, because A2 cards rely on specialized hardware in the host device to work well. The benchmark showed that A1 is the best card to use with Rapsberry Pi 4B and got better result than A2.
Overclock SD Card
DDR50 requires 1.8V signaling, supports frequency up to 50 MHz, sampled on both clock edges and bus speed up to 50 MB/sec per Physical Layer Simplified Specification. However, UHS-I SD card supports a clock frequency of 50 MHz (DDR50), 100 MHz (SDR50) and 208MHz (SDR104) per Physical Layer Simplified Specification. So in theory we can overclock SD card frequency to a higher value, e.g. 100 MHz. However, overclocking only works for Raspberry Pi 3.
SD Card Speed Test
Install the tool to test your SD card speed
sudo apt update
sudo apt install agnostics
my SanDisk Ultra A1 128 GB SD card has the following result
Sequential write speed 25460 KB/sec
Random write speed 1077 IOPS
Random read speed 2642 IOPS
Download Raspberry Pi OS image
Download Raspberry Pi OS Lite or Raspberry Pi OS with desktop from Raspberry Pi official operating system images.
Burn the image to SD card
Download Rufus and unzip the image file you downloaded previously, you will see a single .img file. Select SD card as device and select .img file as Disk or ISO image and then click Start. You may need SD Card Reader USB adapter if your computer doesn’t have SD card slot.
CLI Enviroment Configuration
Boot Raspberry Pi OS Lite
Plug the SD card to your Raspberry Pi and power on the device, follow the instructions to complete the basic setting. You will see the TTY when the boot process finish.
Switch to TTY
You can press Ctrl + Alt + F1/F2/F3/F4/F5/F6/F8/F10/F11/F12 to switch to different TTY console and press Ctrl + Alt + F7 you can switch to desktop environment if you have it installed.
Set Language
Execute sudo raspi-config and then select Localization
Options > Locale. This option will execute following
commands.
Set Keyboard Layout
Execute sudo raspi-config and then select Localization
Options > Keyboard. This option will execute following
commands.
For standard US layout you can select
Generic 105-key PC (intl.) and then select
English US and default layout. We need to
sudo reboot to take effect.
Rotate the TTY Screen
In order to rotate the screen in TTY mode you can use following command
echo <rotation> | sudo tee -a /sys/class/graphics/fbcon/rotate > /dev/null
To always rotate the screen at startup you can add following parameter
to /boot/cmdline.txt
fbcon=rotate:<rotation>
The <rotation> can be 0, 1, 2, 3 that correspond to
0-degree, 90-degree, 180-degree, 270-degree clockwise rotation.
Connect to Wi-Fi
Configure Wi-Fi country code
In the Raspberry Pi OS, 5 GHz wireless networking is disabled until a Wi-Fi country code has been configured by the user.
Execute sudo raspi-config and then select Localization
Options > WLAN Country. This option will execute following
commands.
Find SSID
If you don’t know the SSID scan the networks in the area to find the SSID you want to connect to
sudo iwlist wlan0 scan | greo -i ssid
Enter Wi-Fi Credentials Interactively
Execute sudo raspi-config and then select System Options
> Wireless LAN. This option will execute following
commands.
Enter Wi-Fi Credentials Manually
Create configuration for Wi-Fi
wpa_passphrase <ssid> <password> | sudo tee -a /etc/wpa_supplicant/wpa_supplicant.conf
If you are connecting to a hidden network, an extra option
scan_ssid in the wpa_supplicant.conf file
network section need to be present. You should use tab
instead of space when indenting. By default,
wpa_passphrase also include the plain text version of
your password, but commented out. You should delete this line for
extra security. The final network section should look like
network={
    ssid="<your hidden SSID>"
    scan_ssid=1
    psk="<your encrypted 32 byte hexadecimal PSK>"
}
and ensure the following lines are at the top of
wpa_supplicant file, you need to double check the country
is correct.
ctrl_interface=DIR=/var/run/wpa_supplicant GROUP=netdev
update_config=1
country=<2 letter ISO 3166-1 country code>
then reconfigure the interface with
wpa_supplicant -c /etc/wpa_supplicant/wpa_supplicant.conf -i wlan0 -d
Verify the network
You can verify the connection by running following command
ping 8.8.8.8
If you find the network is unavailable, try to wait 2 minutes or
reboot, them verify with ping again.
Configure Static IP Address
If you want a static IP address, so each time you restart your
Raspberry Pi device or disconnect and reconnect to the network you can
find your device with same IP address. You need to add the following
lines to /etc/dhcpcd.conf.
interface <your-interface-name>
static ip_address=192.168.0.10/24
static routers=192.168.0.1
static domain_name_servers=192.168.0.1 8.8.8.8
You can find your interface name with ip link, router IP
address with ip route show default. You need to ensure
the static IP address is outside of DHCP dynamically assigned IP
address range, you can verify this information in your router. You can
verify your IP address with ip -a address.
Setting up SSH Server
Enable SSH Server
Enter sudo raspi-config in a terminal window. Select
Interfacing Options and then SSH. This
option will execute following
commands
Configure Passwordless SSH Access
Generate new SSH keys using the ssh-keygen command on the
client. Copy your public key to your Raspberry Pi.
cat ~/.ssh/id_rsa.pub | ssh <USERNAME>@<IP-ADDRESS>
            'mkdir -p ~/.ssh && cat >>
            ~/.ssh/authorized_keys'
.
Disable Password Authentication
Edit /etc/ssh/sshd_config and change these options to
no
ChallengeResponseAuthentication no
PasswordAuthentication no
UsePAM no
Change SSH Server Port
By default, SSH server listen to 22. Edit
/etc/ssh/sshd_config and change Port to
other value e.g. 2222
Disable IPv6 SSH Access
Edit /etc/ssh/sshd_config and change
AddressFamily to inet which means IPv4 only.
Listen To Local Network Only
Edit /etc/ssh/sshd_config and change
ListenAddress to private network static address that you
have configured before. When you specify IP address explicitly in sshd
config file,
network interfaces must be prepared prior to sshd start. Execute sudo systemctl edit sshd and add following
content.
[Unit]
After=network-pre.target network.target network-online.target auditd.service dhcpcd.service

[Service]
Restart=on-failure
RestartSec=5
RestartPreventExitStatus=
Then execute
sudo systemctl enable systemd-networkd-wait-online.
Apply Latest SSH Configuration
Restart the ssh system with sudo service ssh reload.
Firewall Configuration
sudo apt install ufw
sudo ufw default deny incoming
sudo ufw default allow outgoing
sudo ufw allow in on eth0 from 192.168.0.0/24 to 192.168.0.10 port 2222 proto tcp
sudo ufw enable
sudo ufw status numbered verbose
Disable Wi-Fi & Bluetooth
Add these 2 lines to /boot/config.txt
dtoverlay=disable-wifi
dtoverlay=disable-bt
Here you can find the documentations of
disable-wifi
and
disable-bt.
Configure Fan
When you buy a Raspberry Pi 4B you can also optionally buy a case with
fan e.g. the official
Raspberry Pi 4 Case Fan. You can simply connect the fan wires to 5V and ground pin but
Raspberry Pi support advance fan control base on temperature. Run
sudo raspi-config, select
Performance Options then select Fan,
introduce the GPIO that will be enabled when temperature exceeds the
limit you introduced. You need to reboot after the configuration
change. Run the command
pinout
to find the location of GPIO and connect it to base gate of a
transistor, connect negative wire of fan to ground. If you are using
NPN transistor then connect emitter gate to positive wire of fan and
5V to collector gate of transistor. If you are using PNP transistor
then connect collector gate to positive wire of fan and 5V to emitter
gate of transistor. You can use protoboard to arrange the wires. You
can verify current temperature using command
vcgencmd measure_temp.
NAS with Samba and External Disk through USB 3.0
Mount External Disk
Attach the external disk to the USB 3.0 port and run following to ensure the device is recognized
sudo blkid
sudo fdisk -l
If your disk is NTFS file system then we need to install
following package
sudo apt install ntfs-3g
Once you know where the drive is located, run following command, the type argument might be different depending on your drive file system
sudo mkdir -p /mnt/shared
sudo mount -t ntfs-3g /dev/<what you have found in previous step e.g. sda1> /mnt/shared
To permanently mount at startup, add the following line to
/etc/fstab
/dev/<what you have found in previous step e.g. sda1> /mnt/shared ntfs default 0 0
Setup Shared Folder on Raspberry
Installing Samba Support with following commands
sudo apt update
sudo apt install samba samba-common-bin cifs-utils
Sharing a folder is easy
sudo useradd -M -s /sbin/nologin samba
sudo passwd samba
sudo chmod 700 /mnt/shared
sudo chown samba /mnt/shared
sudo smbpasswd -a samba
Edit the Samba configuration file /etc/samba/smb.conf and
add the following lines
[shared]
    path = /mnt/shared
    read only = no
    guest ok = no
    security = user
    valid users = samba
    writable = yes
    vfs objects = recycle
    recycle:repository = .recycle/%U
    recycle:touch = yes
    recycle:keeptree = yes
    recycle:versions = yes
In the same file change these two properties to
interfaces = 192.168.0.10/24 eth0
workgroup = <your workgroup name here - you find it in Windows client machine System Properties - Computer Name>
Apply the change
sudo service smbd reload
Allow the Samba traffic through firewall
sudo ufw allow in on eth0 from 192.168.0.0/24 to 192.168.0.10 app Samba
Mount Samba Shared Folder
net use Z: \\192.168.0.10\shared /SAVECRED /PERSISTENT:YES
It will ask for username and password, you should introduce
samba as username.
Remove Samba Shared Folder
net use Z: /delete
NAS Backup with Dropbox and Rclone
Get your own Dropbox App ID
Install Rclone
sudo apt update
sudo apt install rclone
Configure Rclone
rclone config
Follow the instructions until you need to visit an URL, you will need to use SSH local forward
sudo ufw default allow FORWARD
sudo service ufw restart
ssh -p 2222 -N -L 127.0.0.1:53682:127.0.0.1:53682 sgao@192.168.0.10
Open the link that is mentioned in following workaround to avoid expiration issue. You can verify that refresh token is present
cat ~/.config/rclone/rclone.conf
Rollback the ufw configuration
sudo ufw default deny FORWARD
sudo service ufw restart
Backup with Dropbox
We first verify the setup is correct
rclone lsd dropbox:
Then sync from Dropbox to a local folder
mkdir -p /mnt/shared/Dropbox
rclone copy dropbox: /mnt/shared/Dropbox
Finally, keep the folder synchronized with Dropbox
rclone sync /mnt/shared/Dropbox dropbox:
Keep Dropbox Synced With Local
Install the inotify-tools
sudo apt update
sudo apt install inotify-tools
Save following commands to
~/dropbox-sync-from-local-to-remote.sh
#!/bin/bash
# Execute first time after the machine is boot
rclone sync /mnt/shared/Dropbox dropbox:
inotifywait -m -q -r -e create -e modify -e move -e delete --format '%w%f:%e' /mnt/shared/Dropbox | \
while read; do \
    path=$(echo $REPLY | cut -d ":" -f 1); \
    event=$(echo $REPLY | cut -d ":" -f 2); \
    echo "$path was changed because of event $event"; \
    echo "Skipping $(timeout 3 cat | wc -l) further changes"; \
    rclone sync --delete-during /mnt/shared/Dropbox dropbox:; \
done
We need to add execute permission to the script file
chmod +x ~/dropbox-sync-from-local-to-remote.sh
Create a Cron job at boot time by executing
crontab -e and then add following line to the task list
@reboot sleep 10 && ~/dropbox-sync-from-local-to-remote.sh >> ~/dropbox-sync-from-local-to-remote.log 2>&1
Keep Local Synced With Dropbox
Save following commands to
~/dropbox-sync-from-remote-to-local.sh
rclone sync dropbox: /mnt/shared/Dropbox --backup-dir /mnt/shared/Dropbox-Backup --suffix .$(date +"%Y-%m-%d-%H-%M-%S")
Create a Cron job by executing
crontab -e and then add following line to the task list
*/5 * * * * ~/dropbox-sync-from-remote-to-local.sh >> ~/dropbox-sync-from-remote-to-local.log 2>&1
Upgrade Raspberry Pi OS
Modify the file /etc/apt/sources.list and
/etc/apt/sources.list.d/raspi.list and replace every
occurrence of the word buster to bullseye.
sudo apt update
sudo apt -y dist-upgrade
sudo reboot
Remove Unused Software After Upgrade
sudo apt purge geany thonny
sudo apt autoremove
Desktop Environment Configuration
Raspberry Pi OS provides desktop environment, and we can also upgrade from lite version to desktop version, but it is recommended that if you need to use desktop environment, download the desktop version directly.
Install Desktop Environment from Lite Version
sudo apt install -y lightdm raspberrypi-ui-mods rpi-chromium-mods
sudo apt install -y arandr # https://www.raspberrypi.org/forums/viewtopic.php?t=265472#p1613632
sudo apt install --no-install-recommends xinit
After the installation you can enter the desktop environment using
startx from TTY console.
Boot Raspberry Pi OS with desktop
If you boot with a desktop image, you will see a GUI windows that guide you through the initial setup, e.g. configuring the country, language, keyboard, Wi-Fi.
Configure Display Setting
Edit /boot/config.txt and ensure following parameters has
the following values:
hdmi_drive=2 # https://www.raspberrypi.org/documentation/computers/configuration.html#troubleshooting-your-hdmi-2
hdmi_group=2 # https://www.raspberrypi.org/documentation/computers/config_txt.html#hdmi_group
hdmi_mode=82 # https://www.raspberrypi.org/documentation/computers/config_txt.html#hdmi_mode
Rotate your Display in GUI
You can check you available display with:
xrandr -q
Then use the name of display you get previously to rotate the screen
xrandr --output [name of display e.g. HDMI-1] --rotate left